This chapter contains the following topics:
Printing Brief Vendor Item Lists
Setting Vendor Data in I/C Items
The selections in this function let you quickly build the Vendor Items when initially setting up the Purchase Order module. You can also use this selection later on to modify large parts of the Vendor Items all at once.
The selections marked I/C are available only if you are interfaced to Inventory Control.
Select
directly from the Utility menu of the P/O menu.
These two selections are so similar to one another that both can best be understood by first considering their common features.
Similarities
Both selections are available only if you are using the Inventory Control module.
Both of them work by identifying those entries in the I/C Items selection which meet your criteria, then using each such entry as a source for automatically creating a new entry in Vendor Items.
Your selection can be based on any combination of item number range, inventory account, product category, and sub-category.
The results are a first approximation only. Plan on reviewing the new entries after they are loaded, and hand-tailor or delete them as needed.
Any entry that is already present in Vendor Items will not be overlaid by new data even if a match is found in I/C Items.
Differences
Load vendor examines all I/C entries regardless of their prime vendor number. Those that meet your selection criteria are assigned to the vendor whom you have designated to receive them.
This function is useful for loading one vendor with items meeting a particular criterion. For example, if a vendor is known to carry most items of a certain product category, it might be more efficient to create his Vendor Item records with this function, and then delete the few that do not apply.
Load items examines all I/C entries looking for a specified vendor.
This function is especially useful if your I/C Items is already set up with prime vendor information. By entering All for all the fields in this screen, Vendor Item records can by loaded automatically for all your prime vendors.
If your I/C Items is not set up with vendor information and the vendor cannot be deduced from either your product category or your account number, you may still find it easier to use Load items than to set up your vendor items from scratch. You just have to go through your I/C items systematically beforehand, supplying the correct vendor for each one.
If you have not read the previous section Load Vendor vs. Load Items, please do so before proceeding.
Select
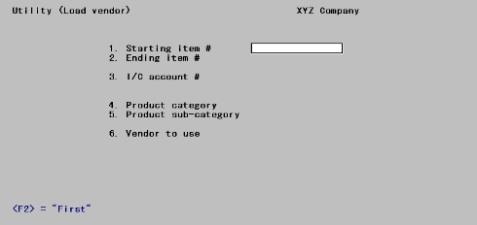
Load vendor from the Utility menu.
The following screen is used to enter your criteria:
Enter the following information:
1. Starting item # and
2. Ending item #
Enter the range of items to load into Vendor Items. Follow the screen instructions.
|
Format |
15 characters |
|
Example |
Press <F2> at each field |
3. I/C account #
Enter the I/C account number for this range of items.
Options
You may also use one of the options:
|
<F2> |
For the next I/C account |
|
<F1> |
For the default I/C account |
|
<F5> |
For All I/C accounts |
Only items in the range selected that also have this I/C account number will be loaded into Vendor Items.
|
Format |
15 characters |
|
Example |
Press <F5> |
4. Product category
Enter the code for the product category for this range of items.
Options
You may use one of the options:
|
<F5> |
To load items for All product categories |
|
Blank |
To load only items with no product category code |
Only items in the range selected that are also in this product category will be loaded into Vendor Items.
|
Format |
5 characters |
|
Example |
Press <F5> |
5. Product sub-category
This field displays as (Not applicable) and may not be entered if you have not specified a product category. Otherwise, enter the code for the product sub-category for this range of items.
Options
You may use one of the options:
|
<F5> |
To load items for All product sub-categories in the selected category(s) |
|
Blank |
To load only items with no product sub-category code |
Only items in the range selected that match the specified product category and sub-category will be loaded into Vendor Items.
|
Format |
Five characters |
|
Example |
Press <F5> |
6. Vendor to use
Enter the number of the vendor for whom you want to load the Vendor Items.
Options
You may use one of the options:
|
<F1> |
For the next vendor |
|
<SF1> |
For the previous vendor |
Temporary vendors are not allowed. A temporary vendor has a vendor number beginning with an asterisk.
Upon selection of a valid vendor, the vendor name and address display below the vendor number.
|
Format |
Six characters |
|
Example |
Type: 100 |
Field number to change ?
Make any needed changes. Upon pressing <Enter> with this field blank, you will be told, All inventory items matching selections 1 thorough 5 will now be loaded for vendor nnnnnn, and asked if it is OK to proceed with loading the items for the vendor that you selected. If you answer Y, there will be a period of processing while the items are loaded. A running display of the item currently being processed appears on the screen.
|
Format |
One character, either Y or N. |
|
Example |
Type: Y |
If you have not read the section Load Vendor vs. Load Items, please do so before proceeding.
Select
Load items from the Utility menu.
The following screen appears:
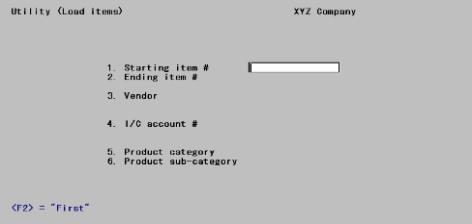
Enter the following information:
1. Starting item # and
2. Ending item #
Enter the range of items to load into Vendor Items. Follow the screen instructions.
|
Format |
15 characters |
|
Example |
Press <F2> at each field |
3. Vendor
Enter a vendor number for this range of items.
Options
You may use one of the options:
|
<F1> |
For the next vendor |
|
<SF1> |
For the previous vendor |
|
<F5> |
For All vendors |
Only items in the range selected which also have this vendor number will be loaded into Vendor Items. The name of the selected vendor will display below its number.
|
Format |
6 characters |
|
Example |
Press <F5> |
4. I/C account #
Enter the I/C account number for this range of items.
Options
You may use one of the options:
|
<F2> |
For the next I/C account |
|
<F1> |
For the default I/C account |
|
<F5> |
For All I/C accounts |
Only items in the range selected that also have this I/C account number will be loaded into Vendor Items. The first line of the account description will display below the account number.
|
Format |
15 characters |
|
Example |
Press <F5> |
5. Product category
Enter the code for the product category for this range of items.
Options
You may use one of the options:
|
<F5> |
To load items for All product categories. |
|
Blank |
To load only items with no product category code |
Only items in the range selected that are also in this product category will be loaded into Vendor Items.
|
Format |
Five characters |
|
Example |
Press <F5> |
6. Product sub-category
This field displays as (Not applicable) and may not be entered if you have not specified a product category. Otherwise, enter the code for the product sub-category for this range of items.
Options
You may use one of the options:
|
<F5> |
To load items for All product sub-categories in the selected category(s). |
|
Blank |
To load only items with no product sub-category code |
Only items in the range selected that match the specified product category and sub-category will be loaded into Vendor Items.
|
Format |
5 characters |
|
Example |
Press <F5> |
Field number to change ?
Make any needed changes. Upon pressing <Enter> with this field blank, you will be told, All inventory items matching selections 1 thorough 6 above will now be loaded into Vendor Items, and asked if it is OK to proceed with loading the items for the vendor that you selected. This is a last warning to prevent confusion between Load vendors and Load items. If you answer Y, there will be a period of processing while the items are loaded. No report is printed, but a running display of the item currently being processed appears on the screen.
|
Format |
One character, either Y or N |
|
Example |
Type: Y |
Use this selection to copy data from Vendor Items for one vendor to Vendor Items for another vendor. You can do this whether or not you interface to I/C.
| • | You can use this feature to define your second choices for vendors, after having set up your prime vendors. If you are interfaced to I/C, be sure to adjust the ranks of the copied records afterwards. |
| • | You can also use this feature when you switch vendors. |
Note that the items are copied, not transferred. If you want to delete them from the old vendor, use the Delete vendor items selection.
Select
Copy vendor items from the Utility menu.
The following screen appears:
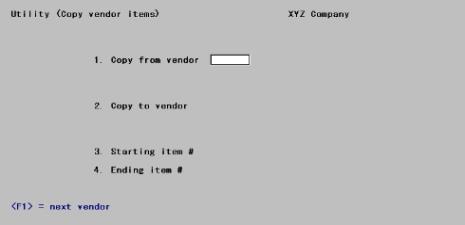
Enter the following information:
1. Copy from vendor
Enter the number of the vendor to copy items from.
Options
You may use one of the options:
|
<F1> |
For the next vendor |
|
<SF1> |
For the previous vendor |
A temporary vendor is not allowed.
Upon selection of a valid vendor, his name and address display below his number.
|
Format |
6 characters |
|
Example |
Type: 100 |
2. Copy to vendor
Enter the number of the vendor to copy items to, exactly as above. A temporary vendor is not allowed, nor may the copy-to vendor be the same as the copy-from vendor.
|
<F1> |
For the next vendor |
|
<SF1> |
For the previous vendor |
|
Format |
One character, either Y or N |
|
Example |
Press <F1> |
Upon selection of a valid vendor number, the vendor name and address display.
3. Starting item # and
4. Ending item #
If you are not interfaced to I/C, enter the vendor’s product number in these two fields.
Enter the range of items to copy from the copy-from vendor. Follow the screen instructions.
|
Format |
15 characters |
|
Example |
Press <F2> at each field for First through Last. |
If a selected item is already exists for the copy-to vendor, it is not changed and the loading process just skips it.
Field number to change ?
Make any needed changes. Upon pressing <Enter> with this field blank, you will be asked, The selected items will now be copied. OK to proceed?. Respond Y to continue or N if you think better of it.
|
Format |
One character, either Y or N |
|
Example |
Type: Y |
The requested information will be copied. As each item is copied, its number will appear on the bottom of the screen.
Use this function to delete vendor items from Vendor Items in groups, instead of individually as is done in the Vendor items selection. Be careful not to delete more records than you want to.
Select
Delete vendor items from the Utility menu.
The following screen appears:
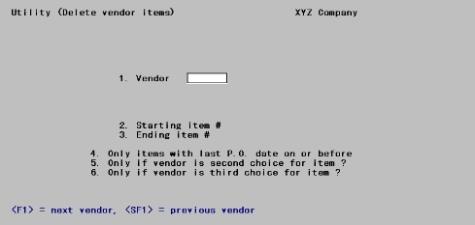
If you are not using I/C with P/O, Fields #5 and #6 do not appear on this screen.
Enter the following information:
1. Vendor
Enter the number of the vendor.
Options
You may use one of the options:
|
<F1> |
For the next vendor |
|
<SF1> |
For the previous vendor |
Upon entry or selection of a valid vendor number, its name and address will appear on the screen.
|
Format |
6 characters |
|
Example |
Type: 900 |
2. Starting item # and
3. Ending item #
If you are not interfaced to I/C, enter the vendor’s product number in these two fields.
Enter the range of items to delete. Press <F2> for First or Last item number.
|
Format |
15 characters |
|
Example |
Type: 1000 at both fields. |
4. Only items with last P.O. date on or before
This field lets you limit the deletion to inactive items. Items included in a purchase order more recently than the date specified will be considered active and will be protected against deletion.
Enter the date or press <F2 > for the Latest date (meaning that all items, however old, will be considered active).
|
Format |
MMDDYY |
|
Example |
Press <F2> |
5. Only if vendor is second choice for item ?
Answer Y if you want to delete items for this vendor only if the vendor is not the prime vendor for these items.
If you answer Y, items will be deleted only if the vendor is listed as second or third choice for the item. Field #6 will automatically be set to Y.
If you answer N, all items for which this vendor is first or second choice will be deleted.
|
Format |
One character, either Y or N |
|
Example |
Type: Y |
6. Only if vendor is third choice for item ?
If you answered Y to the previous field, this field is set to Y also and cannot be entered.
Otherwise, answer Y if you want to delete items only if the vendor is the third choice vendor for these items. Items for which this vendor is the second or first choice are not deleted.
If you answer N, all items for this vendor will be deleted.
|
Format |
One character, either Y or N. |
|
Example |
In this example this field displays as Y and cannot be changed because you have entered Y in the previous field. |
Field number to change ?
Make any needed changes. Upon pressing <Enter> with this field blank, you will be asked, The selected vendor items will now be deleted OK to proceed?. Respond Y to continue or N if you think better of it.
|
Format |
One character, either Y or N. |
|
Example |
Type: Y |
The selected vendor items will now be deleted. As each item expires, its number appears on the bottom of the screen.
Your Vendor Items list can grow very large over a period of time. Therefore, it is a good idea to develop a regular procedure for removing unnecessary information from vendor items and freeing disk space.
Follow these steps:
|
1. |
Print a complete list of Vendor Items at least every six months, in both vendor number order and item number order. |
|
2. |
Review these lists carefully. |
|
3. |
When you find a vendor that you no longer use, delete all items for that vendor, using the Delete function described above. Do this for every vendor you no longer use. |
|
4. |
For each item that you no longer keep in stock, delete all vendor item records for that item through Vendor items. |
|
5. |
Finally, for each vendor from whom you no longer buy certain items, remove those items from Vendor Items. |
|
6. |
To release the disk space formerly taken by unused vendors and items, use Exports and Restores from an export file on Vendor Items. These functions are described in the Data (File) Recovery Utilities chapter in the PBS Administration documentation. |
The Brief Vendor Item List differs from the Vendor Item List (described in Printing Vendor Items List) in allowing restriction by both vendor and item number (not just one or the other). You may use it in conjunction with Load vendor and Load items.
Select
Vendor items, brief from the Reports menu.
The following screen appears:
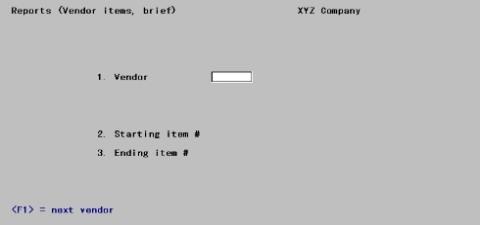
1. Vendor
Enter the number of the vendor whose items you want to appear.
Options
You may use one of the options:
|
<F1> |
For the next vendor |
|
<SF1> |
For the previous vendor |
|
Format |
Six characters |
|
Example |
Type: 100 |
Upon selection of a valid vendor, the name and address display below the number.
2. Starting item # and
3. Ending item #
If you are not interfaced to I/C, enter the vendor’s product number in these two fields.
Enter the range of vendor items to print. Follow the screen instructions.
|
Format |
15 characters |
|
Example |
Press <F2> at both fields |
Field number to change ?
Make any needed changes. Upon pressing <Enter> with this field blank, the Brief Vendor Item List will be printed.
This selection is only available if I/C is interfaced to Purchase Order.
You can run this selection at intervals to keep vendor information in the I/C module consistent with that in P/O and to avoid entering the same information twice.
Select
Set vendor in I/C items from the Utility menu.
The following screen appears:
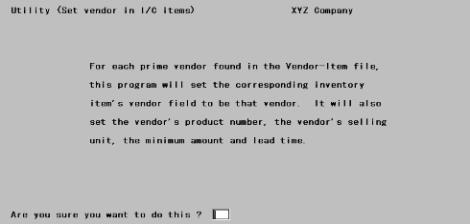
Answer N to stop this procedure, or answer Y to set the specified fields. There will be a period of processing while this occurs, then the Set up vendor items menu will reappear.
If more than one vendor in Vendor items is defined as the prime vendor for the same item, the prime vendor field in Items will be set to whichever vendor happens to have the highest number.